No, I'm not in Hawai'i. I wish I was though! It's been so gray and dreary the last couple days. So, for day 10 of the challenge, I decided to do tropical sunset nails for my gradient. This was my first time doing a gradient manicure, and I love the way it turned out!!!


I started with my normal bases, then put down a coat of Sinful Colors Snow Me White to make the colors pop a bit more. Then I used Orly Spark, Kleancolor Mango, Red Alert, and Purple Disco. I coated it with Revlon Quick Dry Top Coat, then stamped the trees with Wet N Wild Black Lace Creme using the Salon Express plate SE18. Can you believe that I didn't see a single palm tree on any of my Bundle Monster plates? Maybe I just overlooked it. Once the trees were done, I took a flat brush and added the base under the trees. I didn't worry too much about making them identical, since nature isn't! I coated the entire deal with Seche Vite. I'm thrilled with how they turned out! 

Now that St. Patrick's Day has come and gone, it's back to challenge nails for me. Today is day 9: Rainbow. Now, I tried and tried to do traditional rainbows. I tried multiple techniques, but I didn't like how any of them came out. So I thought about it, and I decided that rainbow doesn't necessarily mean an actual rainbow, but just a rainbow of colors. I'd read about watercolor nails, and gave it a go! Now, I think this technique might work better with fewer colors, but I still like how it turned out.


I started off with my normal bases, then put on 2 coats of Sally Hansen Insta-Dri Whirlwind White. I used Seche Vite on top to make it less likely that I'd end up with bald spots when I applied the color. Then, the fun began! I used 6 colors: China Glaze Poinsetta, LA Colors Art Deco Nail Striper in Yellow, a no name bright blue that came in a pack from Big Lots, Sally Hansen Xtreme Wear Sun Kissed, Zoya Holly, and Revlon Impulsive. I used yet another coat of SV on top to give it a nice shine, which I once again completely failed to capture with my picture. Someday I'll get around to making a lightbox, and maybe getting a different camera....

I had this grand plan to do rainbows and pots o'gold on my nails for St. Patrick's Day, but alas, it was not to be. My rainbows just wouldn't turn out!! So I went with plan B: Zoya Holly with pots o'gold that I made using a ziploc bag. For the pots, I started with a base of WnW Black Lace Creme. I decided that didn't look enough like cast iron, so I added China Glaze Stone Cold on top. The coins I made using a dotting tool and Orly Luxe topped with Color Club Take the Stage. I topped the whole deal with Seche Vite. Actually, that's not entirely true. I used Revlon Quick Dry Topcoat on all my fingers on top of the Zoya, then put the decals on my ring fingers, *then* put Seche Vite on just the accent finger. Of course, I had to go and bugger it up by putting the pots on my nails "upside down", but oh well. I'm still really pleased with how it turned out

.


Day 8 of the challenge: Metallic! I used one of my favorite polishes of all time for this mani. Unfortunately, I bought it years ago (before I really got into doing my nails) and they don't appear to actually make it anymore :(


The silver is WnW Precious Metals in Steel. I love it. I don't know why. I just do. I decided to mix it up by trying out my new crackle, Pure Ice Crackle in Strobe Light. I have to say, I'm really pleased with it. I have a couple other crackle polishes: one of the China Glaze metallic crackles and Sally Hansen Crackle in Ink Spot. I have to say, I've always been disappointed and frustrated with the SH crackle. No matter how thick or thin a layer I'd use, it would not crack nicely. I always get vertical cracks with no horizontal cracking what-so-ever. I tried applying it faster. I tried applying it slower. I tried using it over topcoat. I tried using it straight on the polish. I tried bone dry polish. I tried mostly dry polish. I tried everything. And I was sad, because I really like the way crackle looks. Then someone recommended the Pure Ice crackles. I got one a few weeks ago, and was really impressed with it, so when I saw the black at Walgreens, I had to grab it. And I'm glad I did!

As I said in my last post, I'm a bit behind on posting my manicures. So today, you get two!

First up is for day 6 of the challenge: Violet. Well, purple at least.


I started out with my normal bases, then used a coat of Revlon Impulsive as a base. Two coats of Milani 3D Holographic in Hi-Res, and I had scattered holo goodness. I loved the way this looked in the sun! I know some people are all about the linear holos, but man, I love this one. I want to get some of the other colors from this collection, but I haven't been able to find them :( I know that CVS carries them, because I've seen them there, but since I've recently moved, I haven't had a chance to get out there. I was as Walgreens today and looked for them, but had no luck :(

Next up is day 7: Black and White. I'd originally planned on stamping for this manicure, but it just wasn't meant to be. I tried several different designs, and had trouble with all of them. So I put them away and went with WnW Tangled in My Web over Sally Hansen Insta-dri in Whirlwind White instead. 


I'm a wee bit behind on my challenge mani posts. It was a busy weekend! Here's what I had for Blue: Revlon Blue Mosaic. Simple, but oh so sparkly!


I started with my normal 2 bases, then put on a single coat of Revlon Blue Lagoon just to give it a base. I don't think I really needed it, since I used 3 coats of Blue Mosaic in the end. I smoothed it out with Seche Vite. The day after I did this, I added an abstract stamp in white. It really made it look like a mosaic! The white was reminiscent of the grout that would be between the tiles. Sadly, I didn't manage to get a picture of it before it got borked :(

Next up we have green! I *just* got this polish and I've been dying to give it a go. This is Jessica "Iridescent Eye" and it's a dupe for Chanel Peridot at a mere fraction of the cost. Yay!! I tried and tried to get a great picture, but between my poor photography skills and terrible lighting (thank you umpteenth day of rain in a row!), I just couldn't capture the wonderfulness that is this polish. I can't stop staring at my hands, flexing my fingers to see the colors change!


I actually tried a little experiement with this polish, but nothing seems to have come of it. I know that with some duo/multichrome polishes, if you layer it over different colors it brings out different colors in the polish. So, after starting with my normal Nailtiques 2 and Orly Bonder, I started with a base of 5 different colors. From pinkie to thumb I used white, blue, gray, green, and white. I threw the blue in because in the bottle you can see blue around the edges but it doesn't show on the nail at all. Guess what! I don't see a difference in any of the nails, either in person or in the pictures. I guess this is just an opaque enough duochrome that it doesn't really need a base. I added Seche Vite over the whole shebang.

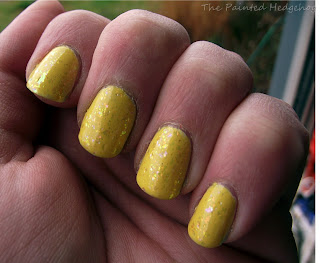
The orange really didn't last long. I just wasn't satisfied with the dots :( So, on to yellow!! Unfortunately, the weather here is still dismal and I don't have a good light source yet. I'm planning on putting together a homemade lightbox soon, but I haven't gotten around to it yet. So, this is the best picture I could get, and it still doesn't capture the rainbow loveliness that is Finger Paints Twisted. My hands look freakishly dry too, since I didn't want to take a minute to moisturize and miss the wee bit of, well, I won't call it sun, but brightness that we got.


I started off with Nailtiques 2 and Orly Bonder, like always. Then I gave my Sally Hansen Insta-dri Whirlwind White a try. And boy, was I impressed with it. If I'd gone a bit slower and been a bit more careful, it would have covered streak-free in one coat. But since I was just using it for a base I wasn't as careful as I would have been if I'd been wearing it alone. Still, I was really happy with it. So after the white was down, I added 2 coats of Orly Sparked. The last few times I used this, it stained my nails through both  my basecoat and my nail treatment, which is why I decided to put down white first. Also, the white helps the color stand out more. I couldn't leave well enough alone, so I added 2 coats of Finger Paints Twisted before putting on 2 coats of Seche Vite. It was odd, even though I used SV, my nails still felt pitted where the flakes were sitting, but after the second coat they were smooth. 

All in all, this manicure is ok. The yellow isn't quite saturated enough for my liking, and I'm really craving something bright and flashy with this gray weather. 

Manicure number 2 for the 30 mani challenge is orange. Maiya over at Tarts N Talons did a similar manicure not too long ago with white, gray, and black. I decided I wanted to give the look a try, and did it with different shades of orange. I'm on the fence about this one. I think I needed to use more dots, and also I might like it better on a solid background, maybe white.

I apologize for the super craptastic picture. My camera batteries are dead (again!) so I used my phone and the weather here is dismal so I had horrible lighting.


I started with Nailtiques 2 and Orly Bonder, then put on a couple coats of an iridescent, super translucent no name polish that I got from a dollar store. Sadly, it doesn't really show up, either in the photo or in person. Then I dotted it with Sally Hansen Xtreme in Crushed and Sunkissed, Spoiled Jail Bait, and Wet n Wild 9.0.2.1.Orange. I topped the whole thing with Seche Vite. 

I'm really not loving this, so it's probably going to come off tonight. On to the next color!

Copyright 2010 The Painted Hedgehog